Big Holed Artisanal Bread

Adapted from Baking Illustrated page 100.

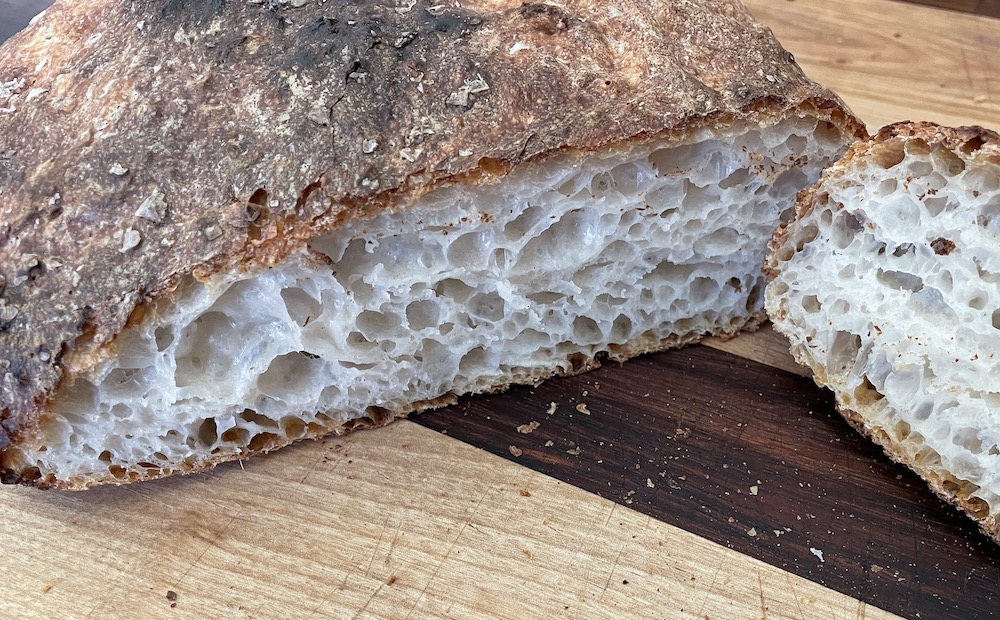
April 2021 - I've spent the last year looking for a recipe to make a great restaurant bread at home. Big air holes in an open crumb, where the gluten forms feather-like strands of cool, damp, chewy goodness. Add a crunchy, brittle crust and I would be completely satisfied.

I've tried several recipes for chiabatta bread and had some good chews, but I wasn't able to always repeat it. I re-read On Food and Cooking to understand more about why recipes call for certain steps. I watched Michael Kalanty lectures as part of a Great Courses series on baking bread - his lectures were astoundingly informative.

Eventually Sherry gave me a copy of the Baking Illustrated chiabatta recipe that forms the basis of this. Their recipe is good, but didn't yield the big holes I wanted. I increased the hydration to 80% added a few steps for flavor and we now have the recipe below. It is repeatable and fabulous. I hope you enjoy it too.

August 2021 - Seeking wisdom I wrote to Michael Kalanty and he replied! He seems like a nice guy and an excellent teacher. I was making a list of questions when he recommended his own book How To Bake Bread: The Five Families of Bread. Wow, a great read. This book answered almost all my questions and gave me new tips that I've added to this recipe to make it even better. For instance, I used to call for a baking stone, but my latest experiment shows that to be unnecessary.

You will need some tools to make this easier:

And remember, ALWAYS - measurements by weight!


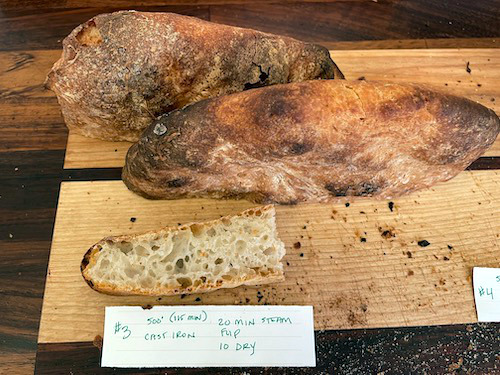
One Early Experiment

More super recipes!

A. bread flour 354 grams
  water 340 grams
yeast 0.25 teaspoon Instant yeast (not Rapid Rise)

This step lets the flour fully hydrate and begin to break down in a process called autolyse. This adds flavor and elasticity to the final dough.

Combine the flour, water and yeast in the bowl of your stand mixer, cutting in the flour with a plastic bowl scraper until all the flour is wet.

Let sit for 20 minutes in a warm room.

If you want to read a bit about autolyse this is interesting.

B.

Using the paddle attachment, mix on low speed for 5 minutes, stopping to scrape down the sides as needed.

This will be a sticky mess.

Cover the bowl with plastic wrap and let sit at room temperature for 8-12 hours. (or more) I typically let it sit 24 hours.

This is called a poolish.

One way to amp up the flavor of your bread is to stash the poolish in a very cool (under 60F) place for another 24 hours. I've been told that the interior flavor of your bread comes from fermentation; this is where that happens.

C. olive oil 1 teaspoon  
    Large bowl  
  yeast 1 teaspoon Instant yeast (not Rapid Rise)
  water 400 grams about 100 degrees
  bread flour 565 grams
  salt 23g 5.5 tsp Diamond Kosher (2.5% of the flour weight)

Rub the olive oil all over the inside of the large bowl.

To the poolish in the mixer bowl add the water and yeast. Cut in with a plastic bowl scraper.

Now add the flour and salt. Use the bowl scraper to cut the flour until it is all wet.

Let this sit for 20 minutes.

Run the mixer on low speed for 6 minutes, scraping down the sides once or twice as needed.

This dough will be a sticky, glutenous mess. It will not pull away from the sides of the bowl.

Using a wet bowl scraper, move the dough into the oiled large bowl.

D. Rise 3 times    

In this step folding the dough over itself creates more small air pockets. These are the pockets that the CO2 from the yeast will diffuse into and balloon up when the bread goes into the hot oven. It may not seem like much, but it makes a big difference.

1. Cover the bowl with plastic wrap and let sit for 60 minutes in a warm room. You want the dough to be between 80 and 90 degrees.

2. After an hour, remove the plastic wrap and dust the top of the dough with flour.

3. Using a wet bowl scraper, gently reach down the side of the bowl all the way to the bottom and lift, stretch, and fold the dough away from the side of the bowl and onto itself. Work around the bowl to make sure each side is folded over. Be gentle, you don't want to cause the dough to completely collapse.

Cover the bowl with plastic wrap again and wait another 60 minutes.

4. Do this one more time: flour top, stretch up sides, wait 60 minutes.

We're looking for the dough to triple in volume. This will be dependent on the temperature of your dough. Sometimes the dough triples in just two hours and I move to the next step then.

E. non-stick spray   such as PAM

TURN ON THE OVEN TO 500F. Place a rack in the middle position in your oven.

Cut two pieces of parchment paper 15 x 12 inches. Fold up a little bit of each side of the parchment; these will help to support the sides of your loaves as they proof. Put the parchments on a sheet pan.

Liberally flour your work station. Slide the dough out of the bowl and onto the floured surface using a wetted bowl scraper. Be gentle. We don't want to knock any of the air out of the dough. The dough will be a sticky mess.

Dust the top of the dough with flour.

Wet your bench scrapers. Use them to cut the dough in half. The loaves will be flat, not mounded high; this is not a loaf of sandwich bread.

Using bench scrapers, roll one loaf over onto a floured area of your station. Dust more flour on the top of the loaf.

Now lift it up by placing the scrapers under each end of the loaf. Bring the scrapers together, lift and move over a piece of parchment. Let the middle drop onto the parchment and then use the scrapers to fold the ends over the middle, like you might fold a piece of paper to put in an envelope. The loaf will be roughly square.

Do the same thing with the other loaf.

Spray some PAM on a piece of plastic wrap and place it loosely over the loaf. Do the same with the second loaf.

Let sit for 90 minutes. The dough should double again. (Again, the exact time will depend on the temperature of your dough.)

F. Maldon salt 2 teaspoons optional
Water In a spray bottle

Gently remove the plastic wrap from your loaves.

Use the spray bottle to get the surface of the loaves pretty wet. Really wet, actually.

Sprinkle with Maldon salt, if using it.

Move the pan holding your loaves into the hot oven.

A. 10 minutes: Close the oven door and wait 10 minutes.

B. 3 seconds: Open the oven door a bit and do a slow count to 3. We are letting the steam escape. The first 10 minute bake was in a humid oven and that keeps the crust hydrated so it will stretch as the bread springs up from the heat of the oven. We vent the steam now so that the crust will dry out and begin to brown.

Close the oven door.

C. 10 minutes: Set a timer for 10 minutes.

D. After 10 minutes take the pan from the oven and close the door to keep it hot. Remove the parchment, turn the loaves over on the baking sheet, and put it back in the oven. The loaves will be a light golden brown.

E. 15 minutes: Bake for another 15 minutes.

F. Remove the bread to a rack and let cool for at least one hour. The crust should be dark brown with some black spots on it. Yummy!

G. You can eat the bread now, but it continues to develop flavor and is best eaten 24 hours later. Fully cooled bread can be stored wrapped in parchment. If the crust becomes soft, 10 minutes in a 350 degree oven will bring it back to crunchy goodness. This bread is also excellent as toast. I recommend toasting it until some parts turn black.


August 2021 bake