 |
Step 1 - Cut two pieces of 1/8 inch tempered masonite to a size of 11-inches square. |
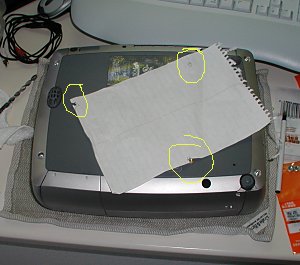 |
Step 2 - We are going to mount the projector to the ceiling upside down. Luckily, the InfocusX1 comes with some nice 4mm mounting holes. Place a piece of paper on the projector and punch holes in the paper where each of the three screws go. You can see them here circled in yellow.
|
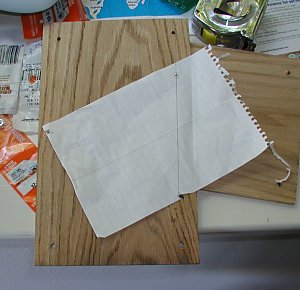 |
Step 3 - Transfer the template hole marks to the wood. Here's how I did it on a piece of oak that subsequently split. That's when I switched to tempered masonite. Good move. |
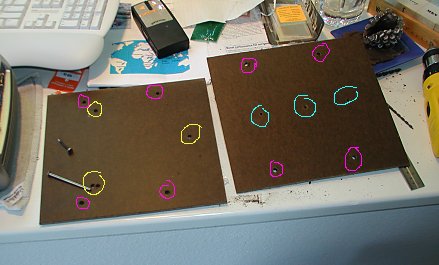 |
Step 4 - Drill 3 holes down the center of the second
board, shown circled in green.
Step 5 - Clamp the two boards together and drill four holes through each board. These are the ones shown in pink.
|
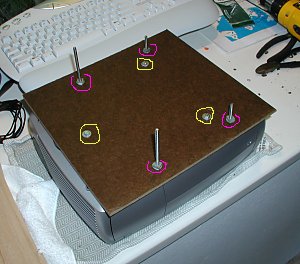 |
Step 6 - Use 4 machine screws, 3/8 inch diameter, 1.5
inches long and 8 nuts. Put a nut on each screw and put the screws
through the four pink holes. Fasten them with another nut on the
other side. In this picture I used two 1.5 inch and two 2.5 inch
screws; this turned out to be the wrong way to go, as you'll see
later.
Step 7 - Use three 4mm screws one inch long to attach the masonite to the projector. These are indicated with yellow circles. I decided to put little washers on each of these too, just to make sure the screws don't pull out.
|
 |
Step 8 - There were no studs where I want to mount the
projector, so I mounted a 1x3 pine board to the ceiling, spanning
two studs. The green circles show where the second masonite square
will be mounted. These match the holes drilled in step 4.
Note that this board points towards my screen. If you have to mount this board parallel to your screen, you should drill the three green holes in the masonite differently - an exercise left to the reader... |
 |
Step 9 - Screw the second masonite square to the
ceiling mount board with three wood screws.
Step 10 - This can be done by one, but is better done with a spare set of hands... Place the projector up on the ceiling so the four screws go through the holes. Use a wing nut on each one to secure the InfocusX1 to the ceiling. You can see here that the front screws are too long. Since the X1 has a built in 22 degree angle of attack, I ended up replacing the front screws with ones the same length as the back ones. A little paint and this looks super.
|
 |
Here's the final product. I hung the Da-Lite screen
from two screw hooks in the ceiling. My throw distance is 18 feet
and the image size is about 7.5 feet wide. Wow. Compare this to the
TV!
This is a daylight picture, you can see the sun streaming through the curtains. That Da-Lite screen is superb!
|